This is default featured post 1 title

Go to Blogger edit html and find these sentences.Now replace these sentences with your own descriptions.This theme is Bloggerized by Lasantha Bandara - Premiumbloggertemplates.com.

This is default featured post 2 title

Go to Blogger edit html and find these sentences.Now replace these sentences with your own descriptions.This theme is Bloggerized by Lasantha Bandara - Premiumbloggertemplates.com.

This is default featured post 3 title

Go to Blogger edit html and find these sentences.Now replace these sentences with your own descriptions.This theme is Bloggerized by Lasantha Bandara - Premiumbloggertemplates.com.

This is default featured post 4 title

Go to Blogger edit html and find these sentences.Now replace these sentences with your own descriptions.This theme is Bloggerized by Lasantha Bandara - Premiumbloggertemplates.com.

This is default featured post 5 title

Go to Blogger edit html and find these sentences.Now replace these sentences with your own descriptions.This theme is Bloggerized by Lasantha Bandara - Premiumbloggertemplates.com.

Thursday, February 26, 2009

Let's Try to add "Alternative Radio Online" widget

Have a little space to add Radio Online widget on web / blog


This is the alternative widget if you want to add the radio online into your web/blog,
but you don't have more space to put it on,,

Don't worry,,,
Now, you can add this one,,

The way is simple, same as I write on the previous post,
You only need to copy-paste the following code below,


it's just the simple alternate to put this widget on your sidebar blogger,,
if you want to know more about this widget,,
you can visit
this site ----> http://www.clearspring.com/widgets/491d15b4f858ce89

or you can put it on your blogger by click this one,,


Let's try it now,,,
Happy Blogging ^_^

Let's Try to add "Live Broadcast Radio Online" Widget

Bored because there is no music that can be heard?


If you like listening to the music, or want to hear broadcast radio from various radio online,,
in this post, I want to give you the easy way to enjoy the radio online that you want,,
or you can also add the radio online widget with this following code to embed into your website / blog,,

it's very easy,,,
You only need to copy-paste the following code below,


You can also adjust the width, as you want,,,
width : 766
heigth : 542
that the original size to see the full view,,

you can put it on your blog by click this one,,


or you also can visit to the web on http://www.1club.fm

Let's Try it now,,,
Happy Blogging ^_^


Wednesday, February 25, 2009

Let's Try "Blogumus" Tag Cloud Widget

Blogumus Tag Cloud Widget


"Blogumus" is a Flash based tag cloud widget which uses scripts converted from Roy Tanck's WP Cumulus plugin for Wordpress. I fell in love with Roy's original Cumulus plugin when I saw it, and simply had to learn how to convert this for use in Blogger powered blogs. The result is the widget you can see in action at the top of this post. Hover your mouse over the Flash object to see the animation begin.

In this post, I'll explain how you can add Blogumus to your own Blogger layout with ease!


Update: Improved Widget Code

I have updated the code required to run this widget to activate links in the tag cloud Flash movie. If you have already installed Blogumus, please replace your widget code with the new updated code, or reference the additional lines to modify your existing installation.

How it works

This widget uses a combination of JavaScript and Flash animation to parse and display your blog labels. Once installed in your template, it should work "out of the box" without any additional tweaking required, though of course you may prefer to change the variables for color, background and size if appropriate :)

You should also be able to move the Label Cloud widget through the Page Elements page of your dashboard if you prefer display in a different layout location.
To see Blogumus in action, both Flash and Javascript must be installed and enabled for your internet browser. However, it does degrade relatively gracefully, and label links will still be clickable (though not animated) for those who do not use JavaScript of Flash (including search engine spiders).

How to install Blogumus in your Blogger layout


Installing Blogumus in your Blogger layout is surprisingly simple! You should only need to copy and paste a section of code to your Blogger template, though any tweaks for the style of display will require some manual editing.

Here are the steps required to install Blogumus in your Blogger layout:

Go to Layout>Edit HTML in your Blogger dashboard, and search for the following line (or similar):
<b:section class='sidebar' id='sidebar' preferred='yes'>

Immediatly after this line, paste the following section of code:


<b:widget id='Label99' locked='false' title='Labels' type='Label'>

<b:includable id='main'>

<b:if cond='data:title'>

<h2><data:title/></h2>


</b:if>

<div class='widget-content'>

<script src='http://halotemplates.s3.amazonaws.com/wp-cumulus-example/swfobject.js' type='text/javascript'/>

<div id='flashcontent'>Blogumulus by <a href='http://www.roytanck.com/'>Roy Tanck</a> and <a href='http://www.bloggerbuster.com'>Amanda Fazani</a></div>


<script type='text/javascript'>

var so = new SWFObject(&quot;http://halotemplates.s3.amazonaws.com/wp-cumulus-example/tagcloud.swf&quot;, &quot;tagcloud&quot;, &quot;240&quot;, &quot;300&quot;, &quot;7&quot;, &quot;#ffffff&quot;);


// uncomment next line to enable transparency

//so.addParam(&quot;wmode&quot;, &quot;transparent&quot;);

so.addVariable(&quot;tcolor&quot;, &quot;0x333333&quot;);


so.addVariable(&quot;mode&quot;, &quot;tags&quot;);

so.addVariable(&quot;distr&quot;, &quot;true&quot;);

so.addVariable(&quot;tspeed&quot;, &quot;100&quot;);


so.addVariable(&quot;tagcloud&quot;, &quot;<tags><b:loop values='data:labels' var='label'><a expr:href='data:label.url' style='12'><data:label.name/></a></b:loop></tags>&quot;);

so.addParam(&quot;allowScriptAccess&quot;, &quot;always&quot;);


so.write(&quot;flashcontent&quot;);

</script>


<b:include name='quickedit'/>

</div>

</b:includable>


</b:widget>

Then preview your template. If installed correctly, you should see the tag cloud appear in your sidebar. Then you are free to save your template, edit the colors and dimensions as required, or move it to a different location.

That's all!

Customizing Blogumus

In this default installation, Blogumus includes the following preset variables:

  • Width is set to 240px

  • Height is set to 300px;

  • Background color is white

  • Test color is grey

  • Font size is "12"

If you would prefer to make your widget wider, shorter, change the color scheme, etc, you will need to do this by editing various parts of the code. I'll go through these options in the order they appear in the widget code.

Editing width and height

The variables for width and height are found in this line of the script:

var so = new SWFObject("http://halotemplates.s3.amazonaws.com/wp-cumulus-example/tagcloud.swf", "tagcloud", "240", "300", "7", "#ffffff");


The width (currently 240) is highlighted in red, while the height (300px default) is highlighted in blue. These numerical values specify the width and height in pixels, so you can alter these of you prefer.


Editing background color

You can change the background color from white to any other color by altering the hex value in the same line:

var so = new SWFObject("http://halotemplates.s3.amazonaws.com/wp-cumulus-example/tagcloud.swf", "tagcloud", "240", "300", "7", "#ffffff");


For example, if you prefer a bright red background, you may replace #ffffff with #ff0000. Take a look at this page for a list of commonly used hex color codes.

Alter the color of text

By default, the text is set to display as dark grey ( hex value #333333). You can alter this variable in the following line:

so.addVariable("tcolor", "0x333333");


Be aware that "tcolor" is a Flash variable and doesn't include the usual hash symbol of hex color codes. Be sure to only replace the numbers!

Adjust the font size

The maximum font size of tags is specified in this line:

so.addVariable("tagcloud", "<tags><b:loop values='data:labels' var='label'><a expr:href='data:label.url' style='12'><data:label.name/></a></b:loop></tags>");

You can alter this to ensure tags are displayed in a bigger or smaller font if you prefer by changing "12" to a larger or smaller number.

While making any of these changes, you should be able to preview your widget and be certain that your new choice of color, dimensions and background are suitable for your needs.

Credits, support and requirements

Blogumus is based on the original WP Cumulus plugin by Roy Tanck, and was converted for use with Blogger layouts by myself.


Please leave the credit links in the widget code intact. These will not be seen by the majority of your blog readers (as they will only display if JavaScript and Flash is not activated) but leaving these links intact is a great way of passing some link love on to Roy for all his hard work, and to inform other Blogger users that they can find the widget codes on this site.

Support/Issues

If you have any problems installing or using this widget, please leave your comments below or direct these to the Blogger Buster forums as Roy will be unable to provide support for installation in Blogger blogs!


Requirements

For Blogumus to display properly in your template, you will need to have Flash Player 7 or higher. You can download the latest Flash Player plugin for your browser from Adobe.


I'm not sure that this installation will support special characters as tags (only Latin characters supported at present). If you do experiecce issues with labels displaying incorrectly, please let me know. I'll try to add more support, but have very little experience using Flash!

Your thoughts?

I hope that you enjoy using Blogumus in your own Blogger blogs! Please feel free to share or syndicate this page with your favorite bookmarking service if you think it is worth a mention, or subscribe to the newsfeed to learn of more great Blogger tutorials as they are posted.

Let's Try it Now,,,
Happy Blogging ^_^

Let's Try to add "Page Navigation Menu" Widget

Most Bloggers will prefer to add Page navigation Menu
Let's see how to add this Page Navigation Menu Widget :


Step 1 :
Login to your Blogger account and Navigate to Layout Section.
Now click Add Page Element link there.

Step 2 :
In that Page Element window , choose HTML / JAVASCRIPT.

Step 3 :
Now add this Javascript in that window.


<style>
.showpageArea {padding: 0 2px;margin-top:10px;margin-bottom:10px;
}
.showpageArea a {border: 1px solid #505050;
color: #000000;font-weight:normal;
padding: 3px 6px !important;
padding: 1px 4px ;margin:0px 4px;
text-decoration: none;
}
.showpageArea a:hover {
font-size:11px;
border: 1px solid #333;
color: #000000;
background-color: #FFFFFF;
}

.showpageNum a {border: 1px solid #505050;
color: #000000;font-weight:normal;
padding: 3px 6px !important;
padding: 1px 4px ;margin:0px 4px;
text-decoration: none;

}
.showpageNum a:hover {
font-size:11px;
border: 1px solid #333;
color: #000000;
background-color: #FFFFFF;

}
.showpagePoint {font-size:11px;
padding: 2px 4px 2px 4px;
margin: 2px;
font-weight: bold;
border: 1px solid #333;
color: #fff;
background-color: #000000;


}

.showpage a:hover {font-size:11px;
border: 1px solid #333;
color: #000000;
background-color: #FFFFFF;

}
.showpageNum a:link,.showpage a:link {
font-size:11px;
padding: 2px 4px 2px 4px;
margin: 2px;
text-decoration: none;
border: 1px solid #0066cc;
color: #0066cc;
background-color: #FFFFFF;}

.showpageNum a:hover {font-size:11px;
border: 1px solid #333;
color: #000000;
background-color: #FFFFFF;
}
</style>


<script type="text/javascript">

function showpageCount(json) {
var thisUrl = location.href;
var htmlMap = new Array();
var isFirstPage = thisUrl.substring(thisUrl.length-14,thisUrl.length)==".blogspot.com/";
var isLablePage = thisUrl.indexOf("/search/label/")!=-1;
var isPage = thisUrl.indexOf("/search?updated")!=-1;
var thisLable = isLablePage ? thisUrl.substr(thisUrl.indexOf("/search/label/")+14,thisUrl.length) : "";
thisLable = thisLable.indexOf("?")!=-1 ? thisLable.substr(0,thisLable.indexOf("?")) : thisLable;
var thisNum = 1;
var postNum=1;
var itemCount = 0;
var fFlag = 0;
var eFlag = 0;
var html= '';
var upPageHtml ='';
var downPageHtml ='';


var pageCount=5;
var displayPageNum=3;
var firstPageWord = 'First';
var endPageWord = 'Last';
var upPageWord ='Previous';
var downPageWord ='Next';


var labelHtml = '<span class="showpageNum"><a href="/search/label/'+thisLable+'?&max-results='+pageCount+'">';

for(var i=0, post; post = json.feed.entry[i]; i++) {
var timestamp = post.published.$t.substr(0,10);
var title = post.title.$t;
if(isLablePage){
if(title!=''){
if(post.category){
for(var c=0, post_category; post_category = post.category[c]; c++) {
if(encodeURIComponent(post_category.term)==thisLable){
if(itemCount==0 || (itemCount % pageCount ==(pageCount-1))){
if(thisUrl.indexOf(timestamp)!=-1 ){
thisNum = postNum;
}

postNum++;
htmlMap[htmlMap.length] = '/search/label/'+thisLable+'?updated-max='+timestamp+'T00%3A00%3A00%2B08%3A00&max-results='+pageCount;
}
}
}
}//end if(post.category){

itemCount++;
}

}else{
if(title!=''){
if(itemCount==0 || (itemCount % pageCount ==(pageCount-1))){
if(thisUrl.indexOf(timestamp)!=-1 ){
thisNum = postNum;
}

if(title!='') postNum++;
htmlMap[htmlMap.length] = '/search?updated-max='+timestamp+'T00%3A00%3A00%2B08%3A00&max-results='+pageCount;
}
}
itemCount++;
}
}

for(var p =0;p< htmlMap.length;p++){
if(p>=(thisNum-displayPageNum-1) && p<(thisNum+displayPageNum)){
if(fFlag ==0 && p == thisNum-2){
if(thisNum==2){
if(isLablePage){
upPageHtml = labelHtml + upPageWord +'</a></span>';
}else{
upPageHtml = '<span class="showpage"><a href="/">'+ upPageWord +'</a></span>';
}
}else{
upPageHtml = '<span class="showpage"><a href="'+htmlMap[p]+'">'+ upPageWord +'</a></span>';
}

fFlag++;
}

if(p==(thisNum-1)){
html += '&nbsp;<span class="showpagePoint"><u>'+thisNum+'</u></span>';
}else{
if(p==0){
if(isLablePage){
html = labelHtml+'1</a></span>';
}else{
html += '<span class="showpageNum"><a href="/">1</a></span>';
}
}else{
html += '<span class="showpageNum"><a href="'+htmlMap[p]+'">'+ (p+1) +' </a></span>';
}
}

if(eFlag ==0 && p == thisNum){
downPageHtml = '<span class="showpage"> <a href="'+htmlMap[p]+'">'+ downPageWord +'</a></span>';
eFlag++;
}
}//end if(p>=(thisNum-displayPageNum-1) && p<(thisNum+displayPageNum)){
}//end for(var p =0;p< htmlMap.length;p++){

if(thisNum>1){
if(!isLablePage){
html = '<span class="showpage"><a href="/">'+ firstPageWord +' </a></span>'+upPageHtml+' '+html +' ';
}else{
html = ''+labelHtml + firstPageWord +' </a></span>'+upPageHtml+' '+html +' ';
}
}

html = '<div class="showpageArea"><span style="padding: 2px 4px 2px 4px;margin: 2px 2px 2px 2px;border: 1px solid #333; background-" class="showpage">Page '+thisNum+' of '+(postNum-1)+': </span>'+html;

if(thisNum<(postNum-1)){
html += downPageHtml;
html += '<span class="showpage"><a href="'+htmlMap[htmlMap.length-1]+'"> '+endPageWord+'</a></span>';
}

if(postNum==1) postNum++;
html += '</div>';

if(isPage || isFirstPage || isLablePage){
var pageArea = document.getElementsByName("pageArea");
var blogPager = document.getElementById("blog-pager");

if(postNum <= 2){
html ='';
}

for(var p =0;p< pageArea.length;p++){
pageArea[p].innerHTML = html;
}

if(pageArea&&pageArea.length>0){
html ='';
}

if(blogPager){
blogPager.innerHTML = html;
}
}

}
</script>

<script src="/feeds/posts/summary?alt=json-in-script&callback=showpageCount&max-results=99999" type="text/javascript"></script>
<div style="text-align:right;font-size:10px;color:000000;margin-top:15px;display:none;"> </div>


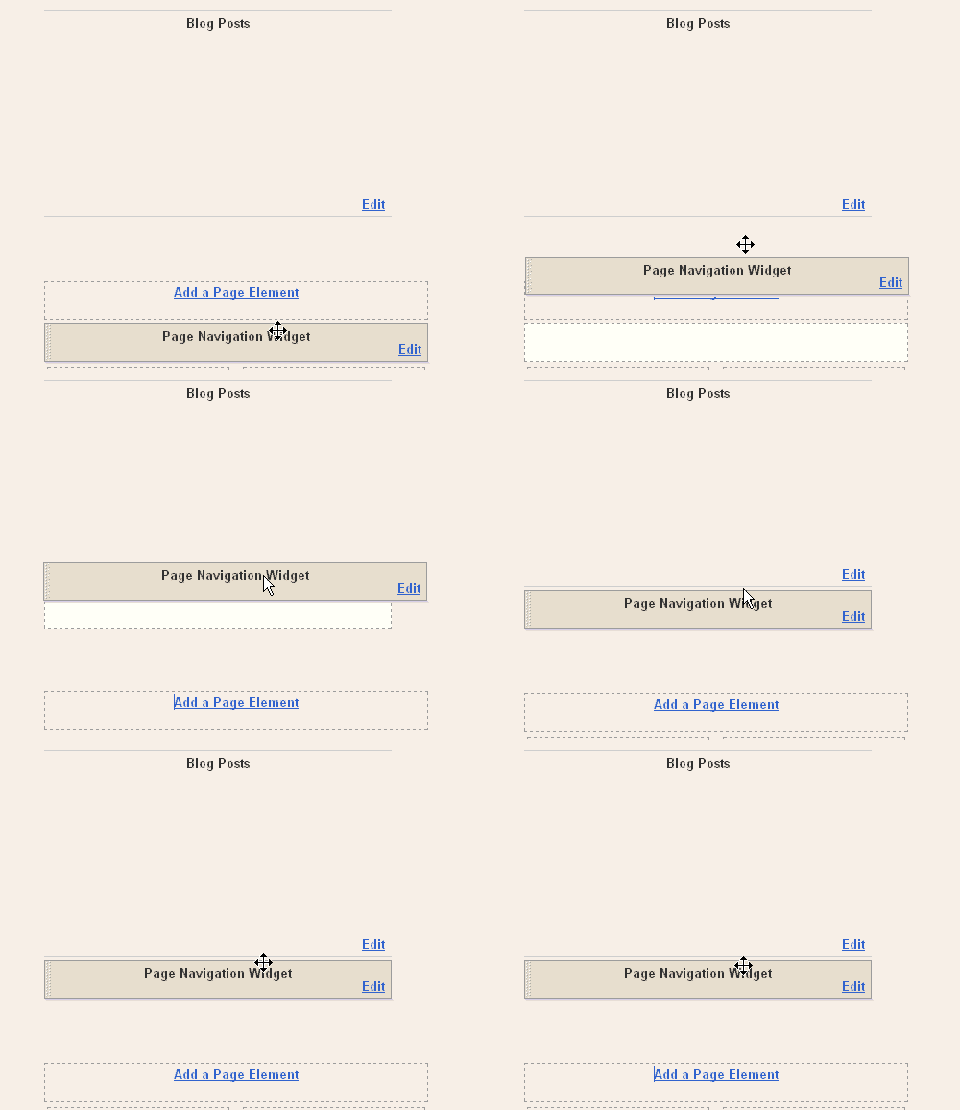
After Adding this Javascript you need to drag and drop the widget below the Blog Posts main widget. See this screen shot

Page Navigation Menu Widget


In the code above you can edit the lines in red to your wish .

1 : var pageCount = 5;

The digit in red represents number of posts to be shown in single page. Change the digit to show as many pages you want.

for example :

In my blog I have put that value as 2 . In each page you can see only 2 posts .


2 : var displayPageNum = 3;

here the digit in red represents number of pages to be listed.

For example :

In my blog I have chosen 3 , then 3 pages will be shown.

Now save your template .

That's all,,It's very easy,
and now we have added Page Navigation menu widget to our blog successfully .

Let's Try it now,,,Happy Blogging ^_^

Source : Blogger Accessorries

Let's Try Learn to Display Related Posts


How to display related posts


Related Posts is the title of the post and related naming is usually based on the displayed label (category), Realated Post is usually a link that show the exact posting single comment in the fields below. The advantage of the post with a related, of course, will make it easier for visitors to our blog to find related articles without having to go and open the pages one by one in the link label.

Let's try to the following ways :


Step I

Entry on the Templates -> Edit HTML -> then enter the javascript code below to above the code </head> -> do not forget saved


Step II

Entry on the Templates -> Edit HTML -> do not forget to check the Expand Widget Templates -> find the code below.

<b:if cond='data:post.labels'>

<data:postLabelsLabel/>

<b:loop values='data:post.labels'
var='label'>

<a expr:href='data:label.url'
rel='tag'><data:label.name/></a><b:if cond='data:label.isLast != "true"'>,</b:if>

</b:loop>

</b:if>


If you have met them, enter the red code between the code above like this.

<b:if cond='data:post.labels'>

<data:postLabelsLabel/>

<b:loop values='data:post.labels'
var='label'>

<a expr:href='data:label.url'
rel='tag'><data:label.name/></a><b:if cond='data:label.isLast != "true"'>,</b:if>


<b:if cond='data:blog.pageType == "item"'>

<script expr:src='"/feeds/posts/default/-/" + data:label.name + "?alt=json-in-script&amp;callback=related_results_labels&amp;max-results=10"'
type='text/javascript'/>

</b:if>


</b:loop>

</b:if>


After that, don't forget to save again.

Step III

Entry on the Templates -> Element -> page and then make a new elemet or click on "Add a Page Element" -> copy-paste the code below and be sure to give the name of the title eg, "Related Articles" -> then do not forget to save .

<script type="text/javascript">

removeRelatedDuplicates();

printRelatedLabels();

</script>


So that Related post does not appear on the main page and only appear on the single post page so we need addition of some code, follow this way:

Entry on the Templates -> Edit HTML -> do not forget to check the Expand Widget Templates -> find the code below, as an example, where before I give "Related Articles", if it is found put the two red code into the code below.

<b:widget id='HTML99'
locked='false' title='
Related Articles' type='HTML'>

<b:includable id='main'>

<b:if cond='data:blog.pageType == "item"'>

<!-- only display title if it's non-empty -->

<b:if cond='data:title != ""'>

<h2 class='title'><data:title/></h2>

</b:if>

<div class='widget-content'>

<data:content/>

</div>


<b:include name='quickedit'/>

</b:if>

</b:includable>

</b:widget>


Finish,,,don't forget to save your work,

Let's try it now,,,Happy Blogging,,^_^


HeadLine News


facebook

New Blogger Template - Smells Like Facebook

Details : THEME NAME: Smells like Facebook THEME URI: http://www.nazieb.com/456/smells-like-facebook DESCRIPTION: The exact Facebook clone theme for Wordpress.Based on Facebook profile page. VERSION: 1.0.5 AUTHOR: Ainun Nazieb AUTHOR URI: http://nazieb.com/[...]
facebook

Netbook Advan Vanbook A1N70T [Alnect Komputer]

Netbook keluaran advan dengan mengusung performa dari prosesor Atom keluaran Intel berasitektur 45nm . Lebih hemat daya dalam penggunaan baterainya. Performa yang cukup baik ditunjukkan netbook ini. Dengan berat hanya 1,2Kg netbook ini cukup mudah dibawa kemanapun Anda menginginkannya.[...]
facebook

In Memoriam 50th of Michael Jackson (Jacko)

The King Of Pop Michael Jackson had passed away on 25th June, 2009 and the moment was shocking around the world. The death caused cardiac arrest at his home in Los Angeles. His death triggered an outpouring of grief around the world,[...]
facebook

Slider ala Zinmag Primus Template

Zinmag Primus is a professional and white elegant Blogger template. Theme Author: Jinsona Design Converted By: Falcon Hive (Installation and Customization),[...]
facebook

Slide Show Smooth Gallery Widget

Slide Show yang begitu keren dengan tampilan featured content dan image,,[...]
facebook

Try TO Costumize Facebook Layout

Sedikit tips buat sobat blogger,, yang mungkin pengen belajar jg gmna caranya utk ganti layout facebook yang kita punya,,, skrg ga usah khawatir,,, ganti dengan sesuka hati tampilan facebook kamu... warna merah... warna hijau.. cerah.. bahkan bosen dengan wallpapernya ganti aza.. [...]
unikz

Total Blog Posts & Comments Widget

Widget yg satu ini untuk menampilkan Statistic Blog Sobat Blogger,, berdasarkan Total Posting yg Sobat buat dan Total Komentar yg masuk ke blog Sobat,, langsung aja gmna cara nya,, silahkan Sobat copas kode di bawah ini,[...]
ipod

CPU Komputer Di Dalam Botol

Apa jadinya kalau CPU komputer berada di dalam Botol minuman!!!! Aneh-aneh aja ya yang dilakukan orang...sampai CPU komputer pun bisa berada dalam Botol minuman.[...]
View All Posts

Increase Earnings


Add URL Here


Sign up for PayPal and start accepting credit card payments instantly.

Let's Join Acme People Search !!


Complete Step 1-3,, Get Free $125, NO SCAM !!


| Social Community | Facebook | Friendster | Twitter |
| News |
Kompas | Media Indonesia | Detik | Seputar Indonesia | Republika | Suara Pembaruan | Antara |
| Forum |
Kompas Forum | Detik Forum | Kaskus | Indo Forum | Chip Forum | Yogyafree | Delphi Forum | Komunitas Muda | Jasakom |
The Press List| Al-Quds.com | Aljazeera English | Media Indonesia | Tempo Newspaper | Tempo Magazine | The Jakarta Post | CNET Asia | CNET.COM

Share

Twitter Delicious Facebook Digg Stumbleupon Favorites More